Tuesday, September 12, 2023

Work on Microsoft Word

After the know about Microsoft Word screen or layout need to work on it. So, we providing to you some also steps with function for works.

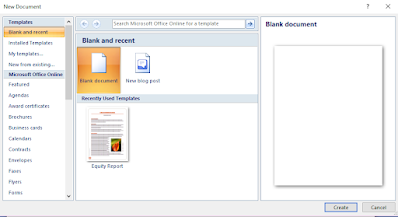
To create a new file:

For creating a new file, take the following steps:

1- Click on Office button or File tab.

2- Click on new option or Ctrl + N. A new dialog box appears on the screen.


 3- Click on Blank document.

4-  Click on Create button. The new document appears on the screen with name of document1.

To Open an Existing document:

To open an existing document, takes the following steps:

1- Click on Office button or File tab.

2- Click on Open option or Ctrl + O. The Open dialog box appears on the screen.


3- Select the file from your HDD or SSD drive. For this, use the scrollbar appears in left side in the Open dialog box.

4- Click on Open button.

To close the opened document:

1- Click on Office button or File tab.

2- Click on Close option.

To write the sentences in a new document:

1- Create a new document.

2- Type the following sentences given below:

Once you have decided what kind of document you want to write, you can start by creating a new document in Word. Then, you can start typing your content. You can use the various formatting options in Word to make your document look the way you want it to. You can also add images, tables, and other objects to your document.

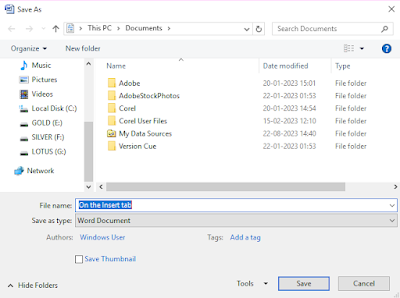
To save the document:

Take the following steps for saving a document:

1- Click on Office button or File tab.

2- Click on Save As option Alt+F+A. The Save As dialog box appears on the screen.

3- Select the drive where you want to save the document with the help of explorer bar. 


4- Type the file name given space right side of the file name head.

5- Click on Save button.

To Exit from Microsoft Word program:

1- Click on Office button or File tab.

2- Click on Exit option or Press Alt + F4 or Click on Close button given upper right side of the window.

To change the font and font size:

1- Select the text which you want to change their font of font size.

2- Click on Home tab.

 Font & Font size screen

3- From the font group, Click on the font's drop down arrow. The font list appears on the screen.

4- Click any one which look good.

5- For font size, Click on the font size's drop down arrow given right side of the font option. The font size list appears.

6- Choose any one which suitable for you.

To Change the style (Bold, Italic or Underline):

1- Select the text which you want to change their style like bold, Italic or Underline.

2- Go to Home tab.


 3- Click on Bold [B] or Italic [I] or Underline [U].

or Press Ctrl + B for bold, Ctrl + I for Italic or Ctrl + U Underline style.

To use of Cut, Copy or Paste option:

1- Choose the text which you want to cut or copy for paste any where.

2- Go to Home tab.

3- From the Clip Board Group, click on Cut (Ctrl+X) or Copy (Ctrl+C) option.


Note: The text which you select and cut, disappears from the text area and will be placed on the clipboard (The temporary storage of Microsoft).

4- Place the cursor at the suitable position where you want to paste the text.

5- Click on Paste (Ctrl+V) option.

To align the text:

1- Select the paragraph for alignment.

2- Go to Home tab.


3- From the Paragraph group, Click on Left or Center or Right or Justify align.

To insert the table:

1- Place the cursor where you want to build a table.

2- Click on Insert Tab. 

3- Click on Drop Down Arrow button given under the Table option from the Table group. The Table option appears as given right side of the screen.

4- Drag the Mouse Pointer on 'Predefined table' option and Click.

5- Or Click on Insert table option. The 'Insert Table' option appears as given below.

6- Put the number in field of Columns or Rows option and Click on OK button.

7- Or Click on 'Draw Table' to draw the Table. The Mouse Pointer's shape change into a Pencil.

8- Draw the Table with the help of Pencil.


To insert the Picture:

1- Place the cursor where you want to insert the Picture.

2- Click on Insert Tab.


3- From the Illustration group, click on 'Picture' option. The Picture dialog box appears on the screen.

4- Select the drive, where have the picture.

5- Select the picture and click on OK button.

To insert the Clip Art:

1- Place the cursor where you want to insert the Clip Art pictures.

2- Click on Insert Tab.

3- From the Illustration group, click on 'Clip Art' option. The Clip Art pane appears right side of the window.

4- Click on 'GO' button.

5- Click on any one Clip Art picture.


Saturday, August 14, 2021

20- MICROSOFT WORD

Microsoft Word is a word processor developed by Microsoft. It was first released on October 25, 1983. In 1981, Microsoft hired Charles Simonyi, the primary developer of Bravo, the first GUI word processor, which was developed at Xerox PARC. Simonyi started work on a word processor called Multi-Tool Word and soon hired Richard Brodie, a former Xerox intern, who became the primary software engineer. Microsoft announced Multi-Tool Word for Xenix and MS-DOS in 1983. Its name was soon simplified to Microsoft Word. Unlike most MS-DOS programs at the time, Microsoft Word was designed to be used with a mouse. Advertisements depicted the Microsoft Mouse, and described Word as a WYSIWYG, windowed word processor with the ability to undo and display bold, italic, and underlined text.

Know more:
 

START MS-WORD 2007 APPLICATION:

  1. Click on Start Menu Button.
  2. Click All Program Option.
  3. Drag on MS-Office 2007 folder and Click.
  4. Click on Microsoft Word 2007 application available in MS-Office 2007 folder. The application open on screen.

ELEMENTS OF MS-WORD 2007 WINDOW:

Office 2007 has a new look difference to previous version. It can be confusing at first sight but once you attain to give few moment of comfort with it, you will find it easy to use. The new interface elements are described in the following sections:

OFFICE BUTTON:

Office button is be situated at the top of Titlebar at the position in left side corner. It has many important commands for essential used likes New, Open, Save, Save As, Print, Send, Close & Exit etc. 

QUICK ACCESS TOOLBAR:

The Quick Access Toolbar is located to the right of the Microsoft Office Button and left of Titlebar. It contains commands that are used most often, for example Redo, Undo and Save. Word 2007 allows you to customize the Quick Access Toolbar by the help of Drop down arrow situated on, meaning that you can add and remove commands as you like.

TITLE BAR:

Situated at the very top of the screen is the title bar of the Application. The title bar will tell you the name of the file (I.e. Document1) and the application you are currently using. To the right of the title bar are three buttons 'Minimize', 'Maximize' or 'Restore' and 'Close' as follow:
  • Minimize: will minimize Microsoft Word and place it at the bottom of your screen on the Task Bar.
  • Restore down: will return the window to its previous size.
  • Close: will close Microsoft Word as well as your document.
  • Maximize: will increase the size of the window .

RIBBON:

The ribbon is a graphical control element in the form of a set of toolbars placed on several tabs situated under the title bar and up of ruler in width toward left to right of the screen. The typical structure of a ribbon includes large, tabbed toolbars, filled with graphical buttons and other graphical control elements, grouped by functionality. Such ribbons use tabs to expose different sets of controls, eliminating the need for numerous parallel toolbars. Contextual tabs are tabs that appear only when the user needs them. For instance, in a word processor, an image-related tab may appear when the user selects an image in a document, allowing the user to interact with that image.

RULER:

The ruler is be situated at the buttom of ribbon horizontally and up of text area space (document window) and at the left side of screen in vertically. It is used to scaling text paper, indentation, margin. In view tab, have a tool, for show or hide ruler on the screen called check box, click on.


TEXT AREA (DOCUMENT WINDOW):

The text area or document window is a blank space of the MS word used to display and typing the contents of a document file. A cursor blinks left side of the text area or document window, from where we typing text.

SCROLL BAR:

A scrollbar is an interaction technique or widget to be situated at the right side and buttom of window by which continuous text, pictures, or any other content can be scrolled in a predetermined direction (up, down, left, or right) on a computer display, window, or viewport so that all of the content can be viewed, even if only a fraction of the content can be seen on a device's screen at one time. It offers a solution to the problem of navigation to a known or unknown location within a two-dimensional information space.

STATUS BAR:

A status bar is a graphical control element which poses an information area typically found at the window's bottom. It can be divided into sections to group information. Its job is primarily to display information about the current state of its window like line number, column number, page number, number of words, language etc.


For work on MS-Office window, go to the next blog.

Tuesday, August 10, 2021

19- ELEMENTS OF A WINDOW

In computing, a window is a graphical control element. It consists of a visual area containing some of the graphical user interface of the program that belongs to and is framed by a window decoration. It usually has a rectangular shape that can overlap with the area of other windows. It displays the output of and may allow input to one or more processes.

Windows are primarily associated with graphical displays, where they can be manipulated with a pointer by employing some kind of pointing device. Text-only displays can also support windowing. Text windows are usually controlled by keyboard and some also respond through to the mouse.

A graphical user interface (GUI) using windows as one of its main "metaphors" is called a windowing system, whose main components are the display server and the window manager.

WINDOW PROPERTIES:

Windows are two dimensional objects arranged on a plane called the desktop metaphor. In a modern full-featured windowing system they can be resized, moved, hidden, restored or closed.

Windows usually include other graphical objects, possibly including a menu-bar, toolbars, controls, icons and often a working area. In the working area, the document, image, folder contents or other main object is displayed. Around the working area, within the bounding window, there may be other smaller window areas, sometimes called panes or panels, showing relevant information or options. The working area of a single document interface holds only one main object. "Child windows" in multiple document interfaces, and tabs for example in many web browsers, can make several similar documents or main objects available within a single main application window.

Applications that can run either under a graphical user interface or in a text user interface may use different terminology. GNU Emacs uses the term 'window' to refer to an area within its display while a traditional window, such as controlled by an X11 window manager, is called a 'frame'.

Any window can be split into the window decoration and the window's content, although some systems purposely eschew window decoration as a form of minimalism.


WINDOW DECORATION:

The window decoration is a part of a window in most windowing systems.

A windows decoration typically consists of a title bar, usually along the top of each window and a minimal border around the other three sides. On Microsoft Windows this is called "non-client area".

In the predominant layout for modern window decorations, the top bar contains the title of that window and buttons which perform windowing-related actions such as:
  • Close
  • Maximize
  • Minimize
  • Resize
  • Roll-up
The border exists primarily to allow the user to resize the window, but also to create a visual separation between the window's contents and the rest of the desktop environment.

Window decorations are considered important for the design of the look and feel of an operating system and some systems allow for customization of the colors, styles and animation effects used.

WINDOW BORDER:

Window border is a window decoration component provided by some window managers, that appears around the active window. Some window managers may also display a border around background windows. Typically window borders can be used to provide window motion enabling the window to be moved or resized by using a drag action.

TITLE BAR:

Title bar is a graphical control element and part of the window decoration. provided by some window managers. It is located at the top of the window as a horizontal bar. It is typically used to display the name of the application, or the name of the open document, and may provide title bar buttons for minimizing, maximizing, closing or rolling up of application windows.

Most web browsers render the contents of the HTML element title in their title bar, sometimes pre- or postfixed by the application name. Google Chrome and some versions of Mozilla Firefox place their tabs in the title bar. This makes it unnecessary to use the main window for the tabs, but usually results in the title becoming truncated.

The title bar often contains widgets for system commands relating to the window, such as a maximize, minimize, rollup and close buttons; and may include other content such as an application icon, a clock etc.

In many graphical user interfaces, including the Mac OS and Microsoft Windows interfaces, the user may move a window by grabbing the title bar and dragging.

TITLE BAR BUTTON (WINDOW CONTROL BUTTON):

Some window managers provide titlebar buttons which provide the facility to minimize, maximize, roll-up or close application windows. Some window managers may display the titlebar buttons in the taskbar or taskpanel, rather than in the titlebars.

The following buttons may appear in the titlebar:

Close
Maximize
Minimize
Resize
Roll-up (or WindowShade)

Note that a context menu may be available from some titlebar buttons or by right-clicking.

TITLE BAR ICON (WINDOW CONTROL ICON):

Some window managers display a small icon left corner of the titlebar that may vary according to the application on which it appears. The titlebar icon may behave like a menu button, or may provide a context menu facility. OS X applications commonly have a proxy icon next to the window title that functions the same as the document's icon in the file manager.

MENU BAR:

This is a list of commands each with subcommands, which is available on every open window. On an opened window, after the title bar comes the menu bar.

TOOL BAR:

The icons on the toolbar are shortcuts of a functions found from the menubar. To view a toolbar, from the View menu, choose Toolbars. The number of toolbars available will depend entirely on the application in which you are working.

SCROLL BAR:

The vertical scroll bar is located on the right side of the window and allows you to scroll up and down through the contents of the window. If the window content does not fit within the width of the window, a horizontal scroll bar will also appear, allowing you to scroll left and right.

CONTENT AREA:

The content area is where the contents of the window are displayed. This is the main part of the window, which typically takes up the majority of the space. In folder windows, the content area displays a list of files and other folders. In images editing programs, the current image is displayed in the content area. In Web browsers, the content area is used to display the current webpage.


NAVIGATION PANE:
Navigation pane is found on the left side of the File Explorer window, the Open File or Save File window. The Navigation Pane lists all of the drives, history, desktop, and downloads that used to be on the Places bar. Below is an example of the Windows Navigation Pane.

STATUS BAR:

Some windows include a status bar along the bottom of the window, which provides information about the contents of the window. In Web browsers, the status bar typically displays the page loading status as well as the location of links when you roll over them.


++++++++++++++++++++++
++++++++++++++
++++

Wednesday, July 21, 2021

18- ESSENTIAL WINDOWS ACCESSORIES

The Accessories folder, accessible through the Windows Start menu, is location to multiple useful application programs. These programs include Calculator, Notepad, Paint, WordPad, Character map, Snipping tool, Remote Desktop Connection, and various System utilities software. Where the Accessories folder is located, and the programs found in that folder, depends on your version of Windows. Older versions of Windows include the Accessories folder, while newer versions of Windows do not, but the programs previously in that folder are still available.

Apart from above mentioned applications, Windows has a few tools for Ease of Access and some System Tools. We’ll be briefly talking about them here.

CALCULATOR:

Windows Calculator is a calculating application included in all the versions of Windows. It can be used to perform simple calculation, scientific calculation and Programming calculation.

For starting calculator program, take the following steps:

  • Click on Start Button.
  • Drag mouse pointer on All program option.
  • Drag the mouse pointer on Accessories option.
  • Click on Notepad program. The program appears on the screen.
From View menu choose the required type of calculator:
Standard, Scientific, Programmer, Statistical

Calculator was first included with Windows 1.0 as a simple arithmetic calculator. In Windows 3.0, a Scientific mode was added, which included exponents and roots, logarithms, factorial-based functions, trigonometry (supports radian, degree and gradians angles), base conversions (2, 8, 10, 16), logic operations, Statistic functions such as single variable statistics and linear regression.

In Windows 7, separate Programmer, Statistics, Unit Conversion, Date Calculation, and Worksheets modes were added. Calculator’s interface was revamped for the first time since its introduction.

On the right of the main Calculator, one can add a panel with Date Calculation, Unit Conversion, and Worksheets. The included Worksheets allow one to calculate a result of a chosen field based on the values of other fields. Pre-defined templates include calculating a car’s fuel economy (mpg and L/100 km), a vehicle lease, and a mortgage. In pre-beta versions of Windows 7, Calculator also provided a Wages template.

NOTEPAD:

Notepad is a basic text editor that you can use to create simple documents. It hasn't really changed much even though all other standard Windows tools were upgraded with each new version. The most common use for Notepad is to view or edit text(.txt) files, but many users find Notepad a simple tool for creating Web pages.

Notepad supports only very basic formatting, you can not accidentally save special formatting in documents that need to remain pure text. This is especially useful when creating HTML documents.

To start the Notepad program, take the following steps:
  • Click on Start Button.
  • Drag mouse pointer on All program option.
  • Drag the mouse pointer on Accessories option.
  • Click on Notepad program. The program appears on the screen.

PAINT:

Microsoft Paint is a simple raster graphics editor that has been included with all versions of Microsoft Windows. The program opens and saves files in Windows bitmap (BMP), JPEG, GIF, PNG, and single-page TIFF formats. The program can be in color mode or two-color black-and-white, but there is no grayscale mode. For its simplicity and that it is included with Windows, it rapidly became one of the most used applications in the early versions of Windows, introducing many to painting on a computer for the first time. It is still widely used for simple image manipulation tasks.

To start the Paint program, take the following steps:
  • Click on Start Button.
  • Drag mouse pointer on All program option.
  • Drag the mouse pointer on Accessories option.
  • Click on Paint program. The program appears on the screen.


CHARACTER MAP:

Character Map is a free utility available in all Windows operating systems for inserting special symbols, accented letters or foreign-language characters into any Windows-based application. Character Map is a useful utility program, especially when dealing with word-processing programs like Microsoft Word.


Character Map is useful in many ways. For one, most special characters need not be assigned on the keyboard and can be found in the Character Map. Therefore, a special keyboard is not necessary. Character Map is especially useful in the case of foreign languages, and for certain symbols used in mathematics or word processing.

To start the Character map program, take the following steps:
  • Click on Start Button.
  • Drag mouse pointer on All program option.
  • Drag the mouse pointer on Accessories option.
  • Click on System tools option.
  • Click on Character map program. The program appears on the screen.

WORD PAD:

WordPad is the basic word processor that has been included with almost all versions of Microsoft Windows. WordPad can format and print text, including font and bold, italic, colored, and centered text, and lacks functions such as a spell checker, thesaurus, and control of pagination. It does not support footnotes and endnotes. WordPad can read, render, and save many Rich Text Format (RTF) features that it cannot create, such as tables, strikeout, superscript, subscript, "extra" colors, text background colors, numbered lists, right and left indentation, quasi-hypertext and URL linking etc.

To start the Paint program, take the following steps:
  • Click on Start Button.
  • Drag mouse pointer on All program option.
  • Drag the mouse pointer on Accessories option.
  • Click on WordPad program. The program appears on the screen.

DISK CLEAN-UP:

Disk Clean-up (cleanmgr.exe) is a computer maintenance utility included in Microsoft Windows designed to free up disk space on a computer's hard drive. The utility first searches and analyzes the hard drive for files that are no longer of any use, and then removes the unnecessary files. There are a number of different file categories that Disk Clean-up targets when performing the initial disk analysis:
  • Compression of old files
  • Temporary Internet files
  • Temporary Windows files
  • Downloaded program files
  • Recycle Bin
  • Removal of unused applications or optional Windows components
  • Setup log files
  • Offline web pages (cached)
  • WinSxS (Windows component store)
  • Compress Old files
  • System error dump files
  • Temporary Internet files
The above list, however, is not exhaustive. For instance, Temporary Remote Desktop files and Temporary Sync Files, may appear only under certain computer configurations, differences such as Windows Operating System and use of additional programs such as Remote Desktop. The option of removing hibernation data may not be ideal for some users as this may remove the hibernate option.

To start the Disk Clean-up program, take the following steps:
  • Click on Start Button.
  • Drag mouse pointer on All program option.
  • Drag the mouse pointer on Accessories option.
  • Click on System tools option.

  • Click on Disk Clean-up program. The first dialog box appears on the screen.
  • Select drive from them like 'C:'.
  • Click Ok. The second window appears on the screen.
  • Click on Check box to select the temporary files list.
  • Click Ok. The third screen appears on the screen.
  • Click Delete button.


SYSTEM TIME:

System time is facility of computer for current time and date that the computer system keeps track of so that applications running on the system have ready access to accurate time. Most computer systems base their system time on the current time in relation to Greenwich, England, which is called the coordinated universal time (UTC), and each time zone is designated as being ahead or behind by a specific number of hours.


If the date and time is resetting to an old date or the wrong time, the CMOS battery is bad and needs to be replaced.

If you are using Windows on a virtual machine, change the date and time on the host machine, not the virtual machine. The virtual machine gets the current date and time information from the host.

CHANGE DATE AND TIME:

In Windows 7 and Windows Vista, follow these steps to adjust the date and time:
  • Press Windows key+D or navigate to the Windows desktop.
  • Click or tap the date and time in the Windows Notification Area in the bottom-right corner of the screen.
  • Select Change date and time settings.
  • In the Date and Time window, under the Date and Time tab, click the Change date and time button.
  • Make your adjustments and click OK.
  • Click OK on the Date and Time window to save the changes.
Windows 8:
  • Click or tap the date and time in the Windows Notification Area in the bottom-right corner of the screen.
  • Select Change date and time settings.
  • In the Date and Time window, under the Date and Time tab, click the Change date and time button.
  • Make your adjustments and click OK.
  • Click OK on the main Date and Time window to save the changes.
Windows 10:
  • Right-click or tap the date and time in the Windows Notification Area in the bottom-right corner of the screen.
  • Click Adjust date/time.
  • Make sure your Time zone is set properly if your computer is displaying the wrong time.
  • To manually adjust the time, turn off the Set time automatically option, then click the Change button.
  • Change the date or time as desired, then click the Change button.


^^^^^^^^^^^^^^^^^^^^^^^^^^^^^^^^
^^^^^^^^^^^^^^^^^
^^^^^^


Sunday, July 18, 2021

17- MICROSOFT WINDOWS

MS Windows is a graphical operating system and GUI based developed by Microsoft Corporation. It allows users to view and store files, run the software, play games, watch videos, and provides a way to connect to the internet. It was released for both home computing and professional works.


Microsoft Windows was first announced by Bill Gates on November 10, 1983. Microsoft introduced Windows as a graphical user interface for MS-DOS, which had been introduced two years earlier. The product line evolved in the 1990s from an operating environment into a fully complete, modern operating system over two lines of development, each with their own separate codebase.

The MS-Windows is the most common operating system in the world. It is the world's  largest selling OS for PCs. There are many Windows version available in the market. I provide Windows version their period given below:

Years                                                   Versions

1985                                                    Windows 1.0

1987                                                     Windows 2.0

1990                                                    Windows 3.0

1993                                                    Windows 3.1

1995                                                    Windows 95

1997                                                    Windows 97

1998                                                    Windows 98

2000                                                    Windows 2000, Me, NT

2002                                                    Windows XP-I

2003                                                    Windows XP-II

2004                                                    Windows XP-III

2006                                                    Windows Vista

2009                                                    Windows 7

2012                                                    Windows 8

2015                                                    Windows 10

2021                                                    Windows 11

More topics:

15-Operating System

12-Introduction of Computer

4- Evolution of Computer

11-Computer Languages 

13- Computer Virus


   Functions of windows:

In an operating system software performs each of the function:

  1. Process management:- Process management helps OS to create and delete processes. It also provides mechanisms for synchronization and communication among processes. 
  2. Memory management:- Memory management module performs the task of allocation and de-allocation of memory space to programs in need of this resources. 
  3. File management:- It manages all the file-related activities such as organization storage, retrieval, naming, sharing, and protection of files. 
  4. Security:- Security module protects the data and information of a computer system against malware threat and authorized access. 
  5. Command interpretation: This module is interpreting commands given by the user and acting system resources to process that commands. 
  6. Job accounting: Keeping track of time & resource used by various job and users. 
  7. Communication management: Coordination and assignment of compilers, interpreters, and another software resource of the various users of the computer systems.

Features of windows:

  • Allows the user to interact with the computer (through the keyboard, mouse, microphone, etc.).
  • Controls the storage of data (images, files, music).
  • Controls hardware attached to the computer such as webcams, scanners and printers.
  • Helps to open and close programs (word processors, games, photo editors, etc.), and gives them part of the computer’s memory to allow them to work.
  • Controls what access to a computer different users have and the computer's security.
  • Deals with errors and user instructions, and issues simple error messages.
  • Promotes multitasking by allowing the user to do several things on the computer at once – for example, watch a video while writing a letter.

After going through all the components, Features and the wide Introduction to Windows, we are going to explore the advantages of Windows.

Advantage of windows:

Let us see some advantages:
  • Desktop as well as tablet-friendly OS.
  • Switch between applications is very easy.
  • Not much technical knowledge is required to operate windows.
  • Windows OS is the dominant OS and enjoys more than 90% of Market share
  • MS windows have a great support community and it also has the largest number of applications.
  • Microsoft provides a powerful set of Enterprise focused Operating System, Applications and the services making it the most dominant player in the OS market.
  • More gaming.

Components of windows:

Windows consists of the following components:

• Desktop:

The desktop is the very first screen we see after windows start. Here, we can see folders like My Computer, Documents, etc. It is the main working area of many of your computer operations. You keep your special files on the desktop so you can access them easily and it gives access to other important functionalities as well such as search bar, taskbar, and file explorer.

• Taskbar:

The taskbar is a simple row at the very bottom of the screen where all currently opened files or applications are listed. It helps you select what you want to keep opened and what you want to close.

• Start Menu:

By clicking the start menu, in the bottom left corner of the screen, a vertical window consisting of the recently opened applications and saved locations will pop-up. Although the Start Menu was a major component of Windows before Windows 8, It was removed from Windows 8 and then brought back in Windows 10. Some start menu items given below:

All programs: All Programs command is the most important function of the Start menu. It’s the master list of every program on your computer. We see all programs that installed in a computer. 

Pictures: Pictures is a folder in the Microsoft Windows operating system that is used to store picture files. By default, when any picture is created or added to a Windows computer, they are saved in the Pictures folder. 

Documents: The Documents folder is a component of the user profile that is used as a unified location for storing personal data. By default, the Documents folder is a folder in the user's profile that is used as a default storage location for saved documents.

Music: Pictures is a folder in the Microsoft Windows operating system that is used to store picture files. By default, when any picture is created or added to a Windows computer, they are saved in the Pictures folder.

Games: This folder tries to act as your central repository for games in Windows. All the Windows games are found there as well as most of the third-party games you install. However, not all games you install might be found there as they might not be integrated with this feature of Windows.You can add games to this panel.

Control Panel: You can use Control Panel to change settings of Windows. These settings tools control nearly everything about how Windows looks and works, and you can use them to set up Windows so that it's just better using computer for you.

Devices and Printers: Device and Printers gives you a simple way to access and manage external devices (including printers, scanners, faxes, cameras) connected to your computer. From there you can see how many documents are in the printing queue, can set the paper size for printing, add or delete a printer, set a default printer or add & remove other devices etc.

Default programs: A default program is the program that Windows uses when you open a particular type of file, such as a music file, an image, or a webpage. For example, if you have more than one web browser installed on your computer, you can choose one of them to be the default browser directly.

Help and support: Windows provides a help system that most software developers use to provide immediate help to the users of their Windows applications. The help is displayed by pressing F1 or selecting the Help menu in the application. The help windows can remain on screen so that you can try  things out better works while you read the instructions. 


 • Maximize/Minimize/Close Buttons:

These buttons are located at the top right corner of our opened documents, and the area used to close, minimize or maximize the document window. They help us jump from one task to another fast and let us decide either we want to close an application or resize it’s area on the screen or just hide it for a few moments.

• My Computer:

This is a system icon. When we double click on My Computer, We find ourselves looking at a window where we can navigate between Computer Drives and Control Panel tools. It also gives us access to different drives on our computer and the data which lies in those drives.

• My Computer Right Click Menu:

When we right-click on My Computer or any other file or folder, We get a menu where we can look into different options related to that specific file, for example, Properties, etc.

• Recycle Bin:

This is a system icon. When we delete a file or folder, It goes into the Recycle Bin from where It can either be restored or permanently deleted from the Computer. Once, a file or folder is deleted from the Recycle Bin, It is very difficult to recover it again. Therefore, the utility of the recycle bin is very essential to use properly if you deal with important documents and files on a day to day basis.

• Shortcut:

A shortcut creates a button or icon which typically is located on the Desktop. By clicking on this Shortcut, We can quickly open the document or application of which it is a shortcut. It helps us save the tedious task of going to the main directory again and again and saves our time.

• Mouse Functions:

The mouse is an input device which is essential in the working of a computer. It performs several important functions on Windows like Scrolling, Right and Left Clicks, etc. It performs another very important function of modern windows which is pointing towards different things and giving special instructions whenever needed.

• Highlight:

When we have opened a document, we can easily highlight the required portion of our document by using Mouse. It is essential for documents and helps keep track of useful information.

• Copy/Cut/Paste:

These options are one of the most essential components of Windows. The copy is used to copy a portion of a document from one document to another or a file or folder from one location to another. The paste is used to paste the copied item on the desired location. While Cut is used to move an item to our desired location in the Computer.

• Toolbar:

The toolbar is a simple row where we can see different options to customize the look of our opened window. It has two types, Formatting Toolbar, and Standard Toolbar. The standard toolbar consists of options like new documents, save a document, etc. While Formatting Toolbar consists of options like font size, font type, etc.

• Drag/Drop:

Dragging an object means to move an object (file or folder) from one location to another and when we reach our desired location, then we can drop the object to that location. It is one of the most used features of windows as you have to move files from one location to another.

• File Extensions:

File extensions are used to define the type of the file. For example an image file will have an extension of .jpg, .jpeg and a Word document will have an extension .docx, .xls, .txt etc. You could have different types of extensions and these extensions help you decide the type of software that will be used to access these files.

• Multitasking:

The term Multitasking means to run more than one file or application on Windows at the same time. It is a very important component of Windows which saves our time as well as allow us to perform more tasks at the same time.

• Virtual Keyboard:

A virtual keyboard is a software through which we can see a keyboard on our screen and use it by our Mouse. It is mostly used in the cases when your keyboard is not working properly or you use windows on a touch device.

• Disk Drives:

Disk Drives are drives used to store applications and files. Hard Drives and Floppy Drives are used for this purpose. They are very important for your instructions as well as your hardware to work properly.

• Defragmenting Hard Drives:

Defragmenting a Drive means to erase all the data from that drive. It is also another important component of windows as users need to clean up their hard drives from time to time and it also comes as a built-in utility.

• Icons:

Icon is a small graphical representation of a program or file. When we double-click an icon, the associated file or program will be opened. For example, if we were to double-click on the My Computer icon, opens in Windows Explorer for displaying. The Icons are a component of GUI operating systems, including Apple macOS X and Microsoft Windows. Icons can help users to quickly identify the type of file represented in the icon.

Types of icon:

System Icons:

System Icons are displayed along left edge of screen. These icons are created automatically by windows during its installation. Example of some system icons are My Computer, Recycle Bin, My Documents, Internet Explorer etc.

Shortcut Icons:

These are the icons with small arrows in the lower left corner. A shortcut icons provides easy access to some objects on our systems, such as a program, a document or a printer. The shortcut icons only contain information about the location of the object but not the object itself.

• Shut down:

Here is an overview of the six different options Windows users have when they go to shut down their systems.

1- Shut down:
Choosing to shut down your computer will begin the process of turning your computer off. If you have any programs open, you will be asked if you want to force close them, and normally be given a short amount of time before they are automatically closed and the computer turned off.

If you are working on documents, or something that requires you to save your progress, it will not be saved when you allow the programs to be force closed. Therefore, when you shut your system down, it is a good idea to save all work before you actually do so.

2-  Log off:
Logging off will cause all of your open programs to be closed and will bring you to the Windows login screen. You will then be able to log in as another user if there are other profiles on your computer.

The key here is that logging off is just like shutting down. Your programs will be closed without any changes made being saved. You will get a warning about this before your computer logs you off, but it is a good idea to save your work before you log off.

3- Switch Users:
Switching Users is similar to logging off, in that when you press this option you are taken to the Windows login screen and able to log in as a different user. The main difference here is that your programs will not be closed, remaining open.

If you have more than one user who uses your computer, and each has their own profile, switching users is a good option. However, if one user decides to shut down the computer, all other programs, regardless of which user has these open, will also be closed. So, it is always recommended to save your work before switching users in case you lose your work.

4- Restart:
Restarting your computer is similar to shutting it down. All open programs are closed and your computer shuts down, before restarting after a couple of seconds. You are then taken to either the login screen (if you have more than one user), or directly to the main desktop.

Again, it is a good idea to save your work before you restart.

5- Sleep:
This is sometimes called standby mode, and is similar to pausing a tv show or movie. When you put the computer to sleep, all programs and processes are halted but remain open – stored in the computer’s memory. When you wake the computer up, all processes and programs will be open and usable pretty much right away.

Putting your computer to sleep is ideal if you are going to step away from your computer for a short amount of time, but it generally isn’t a good idea to let your computer sleep for more than a few hours, as your computer may crash. Note: When you put your computer to sleep, any work done since you last saved is not saved, rather it will remain on the screen and open instead.

6- Hibernate:
Hibernate is similar to sleep mode. The main difference is that all programs and work are saved. The computer essentially turns off, with some components such as the memory still switched on. When you wake your computer from hibernation, all programs you had open will reopen in the same state you left them. This is ideal for if you are not going to be using your computer for an extended period of time, yet want programs to remain open.

The different versions of shutdown have their uses, but whichever you choose, it is always a good idea to save your work regularly just in case something goes wrong. If you would like to learn more about the versatility and features of Windows, please contact us today.

Important key stroke:

Here is a list of commonly used short-cut keys that can provide an easier and quicker method of using computer programs:

List of basic computer shortcut keys:

  • Alt + F: File menu options in the current program.
  • Alt + E: Edits options in the current program.
  • F1: Universal help (for any sort of program).
  • Ctrl + A: Selects all text.
  • Ctrl + X: Cuts the selected item.
  • Ctrl + Del: Cut selected item.
  • Ctrl + C: Copy the selected item.
  • Ctrl + Insert: Copy the selected item.
  • Ctrl + V: Paste the selected item.
  • Shift + Insert: Paste the selected item.
  • Home: Takes the user to the beginning of the current line.
  • Ctrl + Home: Go to the beginning of the document.
  • End: Go to the end of the current line.
  • Ctrl + End:  Go to the end of a document.
  • Shift + Home: Highlight from current position to beginning of the line.
  • Shift + End: Highlight from current position to end of the line.
  • Ctrl + (Left arrow): Move one word to the left at a time.
  • Ctrl + (Right arrow: Move one word to the right at a time.
  • Alt + Tab : Switch between open applications.
  • Alt + Shift + Tab: Switch backward between open applications.
  • Alt + Print Screen: Create screenshot for the current program.
  • Ctrl + Alt + Del: Reboot/Windows task manager.
  • Ctrl + Esc: Bring up the start menu.
  • Alt + Esc: Switch between applications on the taskbar.
  • F2: Rename selected icon.
  • F3: Start find from the desktop.
  • F4: Open the drive selection when browsing.
  • F5: Refresh contents.
  • Alt + F4: Close current open program.
  • Ctrl + F4: Close window in program.
  • Ctrl + Plus Key: Automatically adjust widths of all columns in Windows Explorer.
  • Alt + Enter: Open properties window of selected icon or program.
  • Shift + F10: Simulate right-click on selected item.
  • Shift + Del: Delete programs/files permanently.
  • Holding Shift During Boot up: Boot safe mode or bypass system files.
  • Holding Shift During Boot up: When putting in an audio CD, will prevent CD Player from playing.
  • Windows key:  Appearing start menu.
  • Windows key + I: Open Settings app.
  • Windows key + E: Open File Explorer.
  • Windows key + A: Open Action center.
  • Windows key + D: Display and hide the desktop.
  • Windows key + L: Lock device
  • Windows key + M: Minimize window.
  • Windows key + Shift + M: Maximize window.
  • Windows key + V: Open Clipboard bin.
  • Windows key + Period (.) or semicolon (;): Open emoji panel.
  • Windows key + PrtScn: Capture full screenshot in the "Screenshots" folder.
  • Windows key + Shift + S: Capture part of the screen with Snip & Sketch.
  • Windows key + Left arrow key: Snap app or window left.
  • Windows key + Right arrow key: Snap app or window right.


    *********************************
    ***************
    ******

      Work on Microsoft Word

      After the know about Microsoft Word screen or layout need to work on it. So, we providing to you some also steps with function for works. To...