After the know about Microsoft Word screen or layout need to work on it. So, we providing to you some also steps with function for works.
To create a new file:
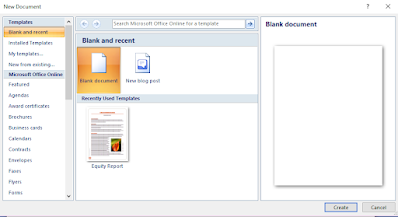
For creating a new file, take the following steps:
1- Click on Office button or File tab.
2- Click on new option or Ctrl + N. A new dialog box appears on the screen.
3- Click on Blank document.
4- Click on Create button. The new document appears on the screen with name of document1.
To Open an Existing document:
To open an existing document, takes the following steps:
1- Click on Office button or File tab.2- Click on Open option or Ctrl + O. The Open dialog box appears on the screen.
3- Select the file from your HDD or SSD drive. For this, use the scrollbar appears in left side in the Open dialog box.
4- Click on Open button.
To close the opened document:
1- Click on Office button or File tab.
2- Click on Close option.
To write the sentences in a new document:
1- Create a new document.
2- Type the following sentences given below:
Once you have decided what kind of document you want to write, you can start by creating a new document in Word. Then, you can start typing your content. You can use the various formatting options in Word to make your document look the way you want it to. You can also add images, tables, and other objects to your document.
To save the document:
Take the following steps for saving a document:
1- Click on Office button or File tab.
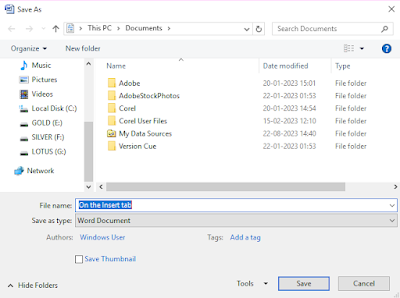
2- Click on Save As option Alt+F+A. The Save As dialog box appears on the screen.
3- Select the drive where you want to save the document with the help of explorer bar.
4- Type the file name given space right side of the file name head.
5- Click on Save button.
To Exit from Microsoft Word program:
1- Click on Office button or File tab.
2- Click on Exit option or Press Alt + F4 or Click on Close button given upper right side of the window.
To change the font and font size:
1- Select the text which you want to change their font of font size.
2- Click on Home tab.
Font & Font size screen
3- From the font group, Click on the font's drop down arrow. The font list appears on the screen.
4- Click any one which look good.
5- For font size, Click on the font size's drop down arrow given right side of the font option. The font size list appears.
6- Choose any one which suitable for you.
To Change the style (Bold, Italic or Underline):
1- Select the text which you want to change their style like bold, Italic or Underline.
2- Go to Home tab.
3- Click on Bold [B] or Italic [I] or Underline [U].
or Press Ctrl + B for bold, Ctrl + I for Italic or Ctrl + U Underline style.
To use of Cut, Copy or Paste option:
1- Choose the text which you want to cut or copy for paste any where.
2- Go to Home tab.
3- From the Clip Board Group, click on Cut (Ctrl+X) or Copy (Ctrl+C) option.
Note: The text which you select and cut, disappears from the text area and will be placed on the clipboard (The temporary storage of Microsoft).
4- Place the cursor at the suitable position where you want to paste the text.
5- Click on Paste (Ctrl+V) option.
To align the text:
1- Select the paragraph for alignment.
2- Go to Home tab.
3- From the Paragraph group, Click on Left or Center or Right or Justify align.
To insert the table:
1- Place the cursor where you want to build a table.
2- Click on Insert Tab.
3- Click on Drop Down Arrow button given under the Table option from the Table group. The Table option appears as given right side of the screen.
4- Drag the Mouse Pointer on 'Predefined table' option and Click.
5- Or Click on Insert table option. The 'Insert Table' option appears as given below.
6- Put the number in field of Columns or Rows option and Click on OK button.
7- Or Click on 'Draw Table' to draw the Table. The Mouse Pointer's shape change into a Pencil.
8- Draw the Table with the help of Pencil.
To insert the Picture:
1- Place the cursor where you want to insert the Picture.
2- Click on Insert Tab.
3- From the Illustration group, click on 'Picture' option. The Picture dialog box appears on the screen.
4- Select the drive, where have the picture.
5- Select the picture and click on OK button.
To insert the Clip Art:
1- Place the cursor where you want to insert the Clip Art pictures.2- Click on Insert Tab.
3- From the Illustration group, click on 'Clip Art' option. The Clip Art pane appears right side of the window.
4- Click on 'GO' button.
5- Click on any one Clip Art picture.


No comments:
Post a Comment